How many of you live in a mobile home, manufactured home, or trailer?
Most of them are pretty much set up the same, unless you get a custom set-up. Ours is 30 some odd years old. And it has a time keeping itself warm. Every year I tell Husband that this is the last year I will suffer a winter in this thing. However things creep up, and we have to put off building something new. Our biggest obstacle is that we live in one of the few counties that actually have building codes other than, if I push on it and it doesn't fall, it's all good. (that and money of course, but that goes with the building code problem)
So what we are doing in the interim is "customizing" the home. Things like putting in a real floor is quite normal for a trailer house, especially when one falls through it. I've done that, what. . . twice now? But the biggest problem is pipes freezing.
I have something that I think was once suppose to be a dinning room. Or at least a space to but a desk size table into for people to eat on with a cheap lamp type chandelier hanging above it. A silly little table isn't big enough for the 5 of us, we have tried. And it has the washer and dryer in a closet type thing in the same area. We have taken the fridge out of it's cubby hole and put it in the dinning area, along with the 2 upright freezers. But the washer is on the north side of the house. Bad Bad Bad. The lines to it freeze every year.
We moved the laundry area to the master bath. Our master bath has been all kinds of things over the years, ever since we removed the brittle plastic garden tub because of a leak and mold. I think creating a laundry room will be the last step. It is 12F now, and the lines didn't freeze! With as much laundry as I have to do between the 5 of us and our various chores resulting in much dirt, dust and oil, this is great! Plus the first time in 10 years that I could do laundry on such a cold day.
But now we have an empty hole in this dinning area. Husband will be putting in a new pantry in it. This helps out greatly, and I will have a place to put all those canning jars!
We have several winter projects we are working on. Maybe with the customization of our own trailer will help give some of you, that are tired too of living in one of these things, a few ideas of your own.
And I would love to hear about your own tailored trailer.

Donate Now!

Buy a membership or koozies to help!
Showing posts with label winter projects. Show all posts
Showing posts with label winter projects. Show all posts
Thursday, January 12, 2012
Tuesday, January 10, 2012
What are you doing with them?
Kids crack me up sometimes. Yesterday I took cupcakes to Small's classroom. The first question and the multiple follow up question, was did I make the cupcakes myself. When I answered yes to one, they smiled and excitedly told the child next to them that I had made them. I am assuming homemade is a treat to most of them, and they seem to prefer it as excited as they were getting. I know Small will come home with a cookie or cupcake with only a couple bits in them, telling me they were too sweet and didn't like it. You can tell by looking they were store bought. But my kids are so use to homemade, and not so sweet.
While I was there a phone call came in on my cell. I sent it to voicemail, because I have that option even though I do not have a voice mail set up. But I could see the caller ID. Once I left the school I called the guy back. He is bringing us 15-20 telephone poles over in the next few days
Husband was all giddy. "Wasn't expecting that many!" I informed Husband that the guy said that was the minimum he would be bringing over, as soon as he finds out how many have already been spoken for, we could get more,
Husband's eyes then lit up. "you know what we can do with those? I said I could have a zombie proof fence. Have you seen telephone pole fences? We have some people in town that have one, pretty freakin cool looking, and nothing is getting over them.
Of course Husband nodded. He was thinking about the walipini, and the "ditch". If we get the "ditch" 6 ft deep we can keep my preferred flavor of fish. Husband is all excited about the possibilities right now. I have to get him to narrow his focus and pick one project at a time. These poles are 30 -35 ft a piece!
So I am feeling a bit defeatist this morning. 2 reasons. First we have come to the conclusion we need a bit of help launching the shop and have decided to go ahead a try using the site peerbackers. And the second is that we went and looked at a place, that was close to perfect, except for the carpeting. It was an old post office, everything was concrete blocks, including the floor. We offered to buy the carpet, so we could rip it out and be replaced later, but I got a phone call later with a no. Maybe something else will open up in the next few months.
Do you guys want my noodle recipes? I know you can find them anywhere, but thought I would ask if you wanted mine. Many go through the recipe page at the top of this blog. Well, I should be making noodles tonight, always looks like colorful streamers hanging from my kitchen ceiling.
Thursday, December 01, 2011
Homemade gift for the teen boy ~Devil Sticks~
Luckily for me Large is a dork. No worries, he knows he is a dork and is very proud of his oddness. The Devil Sticks are not going to be for any boy (girls like them too). A kid that likes Hackey Sacks or juggling, medieval reenactments or RPG's (not video games). If you don't want to deal with the negative side of teen angst, be aware of what your kid is into, could make for a miserable Christmas morning.
These Devil Sticks are for the beginner.
You will need:
2 wooden dowels
4 feet of 5/16" diameter
2 feet of 1/2" diameter
Athletic tape any color(s)

What to do:
Cut the dowels to 2 feet in length. You will need 1 of the thick dowel and 2 of the same length of the thinner dowels.
Take one of the tapes and pull down a long piece, keeping it attached to the roll. Spin the tape so that it spiral on itself, lazily. Wrap this around your thick dowel, sticky side out. Lattice the dowel with the tape, like this:

Reverse the direction, doubling up but creating the lattice look. Make sure you overlap the previous tape.
You can use the same color tape here, sticky side down, cover the lattice work thoroughly. On each end of your thick stick, you will need to make counter weights. Use the tape to do this. Wrap the tape around each end, testing out the balance as you add to it.
Wrap tape around your 2 hand sticks (thinner dowels) just the same as the exterior part of your middle stick (thicker dowel) but not the lattice work. However you will need to vary the direction in which you wrap and create small bumps as you go. You can do this in multiple colors.


Look for possible savings for supplies for devil sticks at Home Depot.
These Devil Sticks are for the beginner.
You will need:
2 wooden dowels
4 feet of 5/16" diameter
2 feet of 1/2" diameter
Athletic tape any color(s)
A hand saw
What to do:
Cut the dowels to 2 feet in length. You will need 1 of the thick dowel and 2 of the same length of the thinner dowels.
Take one of the tapes and pull down a long piece, keeping it attached to the roll. Spin the tape so that it spiral on itself, lazily. Wrap this around your thick dowel, sticky side out. Lattice the dowel with the tape, like this:

You can use the same color tape here, sticky side down, cover the lattice work thoroughly. On each end of your thick stick, you will need to make counter weights. Use the tape to do this. Wrap the tape around each end, testing out the balance as you add to it.
Wrap tape around your 2 hand sticks (thinner dowels) just the same as the exterior part of your middle stick (thicker dowel) but not the lattice work. However you will need to vary the direction in which you wrap and create small bumps as you go. You can do this in multiple colors.

This is your finished product. You can add tassels to the end of the middle stick with the tape if you want.
And when they get really good at it, you can add fire

If you don't know what Devil sticks are or how to use them, here is a video.
Look for possible savings for supplies for devil sticks at Home Depot.
Sunday, November 20, 2011
Fun with Boys
Medium is stretching his legs as a tattoo artist.

They used my fabric paint. I warned them when I first saw it.

Now he itches.
Small decided to try his hand at it as well.
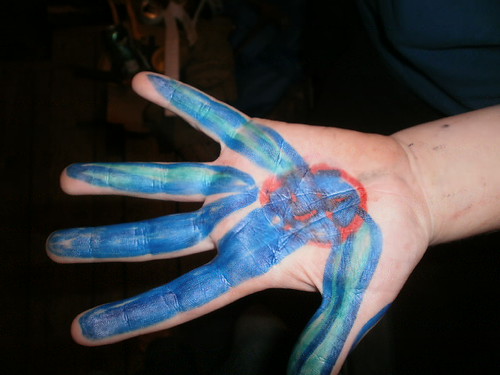

What else are you going to do on a cold day in the boonies?
They used my fabric paint. I warned them when I first saw it.
Now he itches.
Small decided to try his hand at it as well.
What else are you going to do on a cold day in the boonies?
Friday, January 07, 2011
White Trash with a Purpose episode #13
I have been thinking on it and I believe that Husband needs his own tv program. You paying attention DIY Network? I mean the way he can take "trash" and turn it into something very useful is simply amazing to me.
The Hanging box
Here is a tip for you, contractors will throw out privacy fencing material if it is flawed, crack or just plain unpleasant. The ones that are cracked, as long as it isn't more than half way up, can be used for many other projects.
Now the Hanging box is wonderful for dry aging meats that hang no longer than 48 hours. Longer than that and you will need to regulate the temperature better.

Right now it holds four 20lbs turkeys easily. Later hooks will be added to hang smaller animals, as well as being plumed into some piping and a fire box to be used as a smoker.
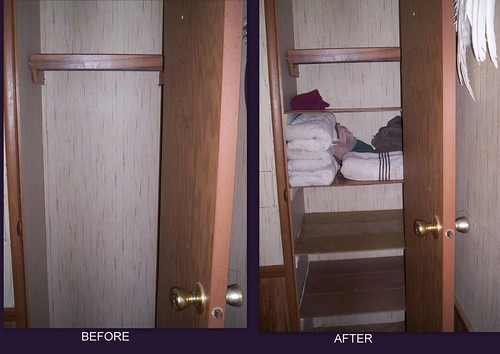
The Linen Closet.
Many of you know that we live in a single wide trailer. The single most thing I hate about the homestead. We have finally resigned ourselves to the fact that because of the lay off we will be unable to build our dream house for a few years. Because of this fact we have decided to customize the aging mobile home. First is my linen closet. I do have a set of cabinets in the bathroom. Not enough room! Not only in the cabinets but also cramps up the bathroom.
Using old window sills and warped wood flooring, Husband created this for me.
The boys room.
For some strange reason, the people we bought the homestead from decided to take the closet with them. There was no doors, no shelves, no rail. I never figured that one out. We used it as part of the room rather than a closet. But the boys are getting bigger and acquiring more items.
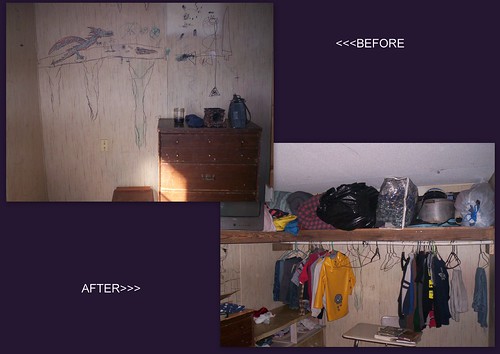
A little paint and some cabinet doors to hide the blankets and seasonal clothing, it should be very pleasant to behold. He also has plans on building cubbyholes into the bottom for shoes and toys. It was built using dry wall that was removed from the closet (it had about 3 feet sticking out causing a large cubby area) window sills, wood flooring and pvc pipe. The shelf is strong enough to hold a television.
Total price for all 3? $0
The Hanging box
Here is a tip for you, contractors will throw out privacy fencing material if it is flawed, crack or just plain unpleasant. The ones that are cracked, as long as it isn't more than half way up, can be used for many other projects.
Now the Hanging box is wonderful for dry aging meats that hang no longer than 48 hours. Longer than that and you will need to regulate the temperature better.
Right now it holds four 20lbs turkeys easily. Later hooks will be added to hang smaller animals, as well as being plumed into some piping and a fire box to be used as a smoker.
The Linen Closet.
Many of you know that we live in a single wide trailer. The single most thing I hate about the homestead. We have finally resigned ourselves to the fact that because of the lay off we will be unable to build our dream house for a few years. Because of this fact we have decided to customize the aging mobile home. First is my linen closet. I do have a set of cabinets in the bathroom. Not enough room! Not only in the cabinets but also cramps up the bathroom.
Using old window sills and warped wood flooring, Husband created this for me.
The boys room.
For some strange reason, the people we bought the homestead from decided to take the closet with them. There was no doors, no shelves, no rail. I never figured that one out. We used it as part of the room rather than a closet. But the boys are getting bigger and acquiring more items.
A little paint and some cabinet doors to hide the blankets and seasonal clothing, it should be very pleasant to behold. He also has plans on building cubbyholes into the bottom for shoes and toys. It was built using dry wall that was removed from the closet (it had about 3 feet sticking out causing a large cubby area) window sills, wood flooring and pvc pipe. The shelf is strong enough to hold a television.
Total price for all 3? $0
Thursday, September 30, 2010
Lots to do before winter
we are hustling to get all our projects done for winter.
Rabbit hutch
put garden away
smoke house?
and I fell through the bathroom floor.
Then there is the wedding prep to finish up. A friend of mine has offered to make me my cloak. Huzzah! So I decided to bid on a dress (as per skippy's advice) So far I am the highest bidder, but there is still over a day left in the bidding. Fingers crossed!
We have to build a platform for the drummer.
clean up the white trash
and. . . well as for physical labor, that's all, besides the cooking.
And all the goats except Zombie have been sold. They seem to be going to a good home. Husband is thrilled to have them gone. too destructive for our taste. I have the sheep, so with the next girl born I plan on working with her so she isn't as wild as the others and hopefully milk her later in life for soaps and cheese.
Tuesday, February 23, 2010
White Trash at their finest (pic heavy)
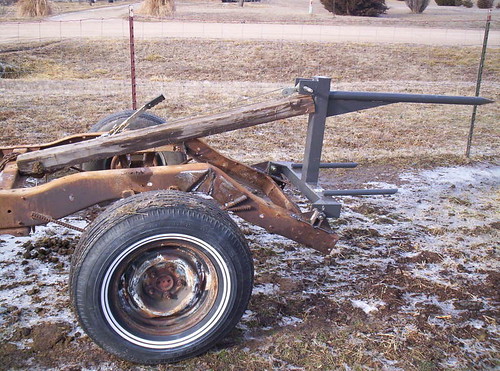
The Hay Spike Trailer will be hence forth known as The Husbands Bale Spear Dolly
This is the core of the project. It is not finished, but it is at it's primitive yet functioning level. To get to this point you will need
a detached truck bed trailer
Hay spike
Pipe
couple pieces of angle iron
Harley Davidson front axle 3/4 inch (any solid of that size will work)
piece of chain
3/8 inch bolts to hold chain together
BFH (Big Frickin' Hammer)
Saws all
welder
come-along
A torch if you got em' other wise heat up the corners and whack it with the BFH
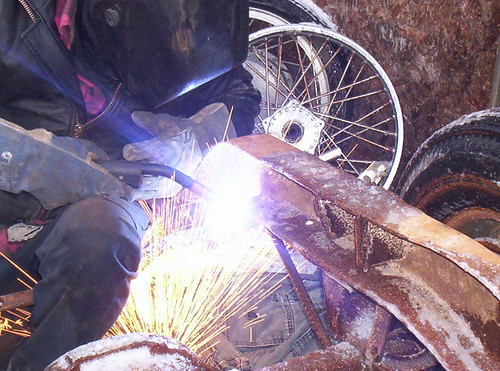
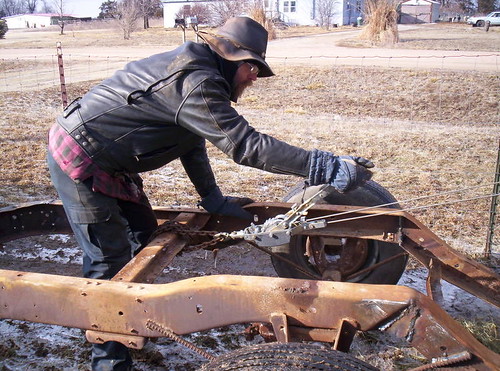
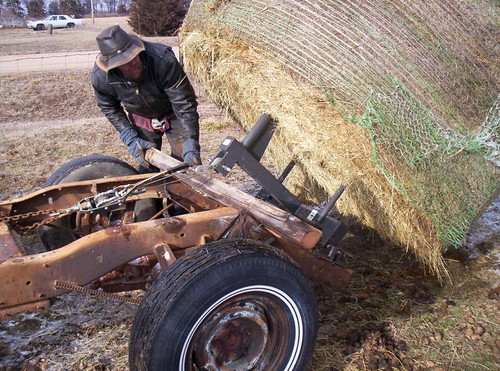
First remove the bed from the frame of the truck bed. Make sure that it is below freezing outside and it is only you and your wife. Yell at her when she complains that the bed just fell on her hand, tell her to suck it up and ask her if she's a PIONEER WOMAN!?!
Place the hay spike on the frame, calculate the approximate center of your bales (5 foot bale, theoretically 2 1/2 feet from the ground) The lower it is the better leverage you could have. You might have to lower your rails on the frame. Our frame has zero suspension, all the springs have been removed, so it is sitting on it's bump stops. Blink bars have been welded to the sides of the frame then down to the axle in a V shape to stabilize the axle to the frame, welded directly to the bump stops.
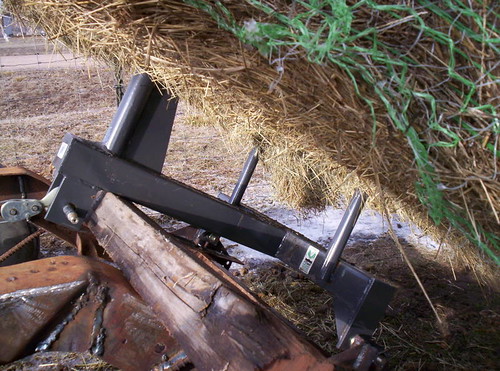
Take two 3 inches of 1 inch steel pipe, heavy gauge, we used the HD axle spacer, cut 4 pieces 2 1/2 inches long out of 3 inch angle iron. Weld the pipe using two pieces of angle iron, opposing in an S or lightening shape, welding it square and flush to one end of the top outside of the angle iron. When done it will look like a P with a tail. Stand it up , clamp it down and weld top and bottom. Take the other piece of iron and box in the P to make it look like inverted T with a dot on top, creating a pivot point with two flanges going forwards and back. Clamp to another piece of angle iron for alignment, weld the top side, cool, flip and weld the bottom side. Now you have an assembly that can be mounted to a flat rail of the frame. Do that twice, to create pivots for both sides.
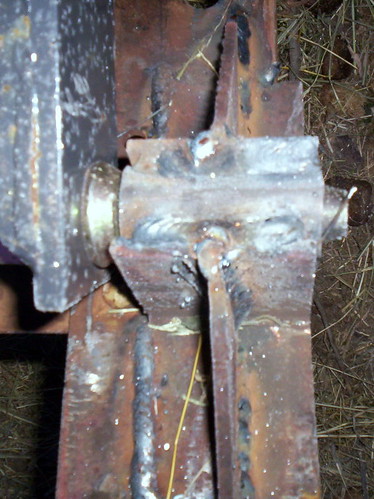
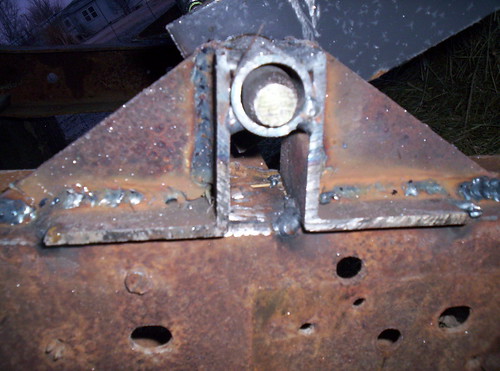
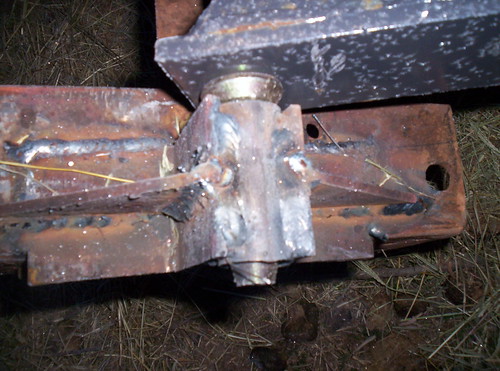
Calculate your height at plum, make sure your frame tongue is level with the scars on your knees, to get that height. (level to your hitch). Slide your spear lower to points or the pivot pins into your newly made pivots. Clamp down your pivots and weld them onto your frame at the predetermined spear height. Use corner gussets that were cut scraps, 3"x4". Put vertical gussets in the center of the angle iron pivots, weld them.
Ladies, go out and take a photo, while it is snowing and he is welding. Call him silly and run away.
Next, measure for a 4x4 "kick stand" up to the bottom side of the top mount to a frame structure to buck it, wrap a chain around the cross member and link the top mount, come-along to the chain. From there, double check measurements for the 4x4. Measure twice cut once, give yourself a little room to cut again. Then cut the wood, put under the mount wedge in the cross member, then pull everything tight with the come-along. Spear should be relatively horizontal, come-along tight, board wedged in place. At that point you are ready for application.
On the weld, turn it up and burn it in.
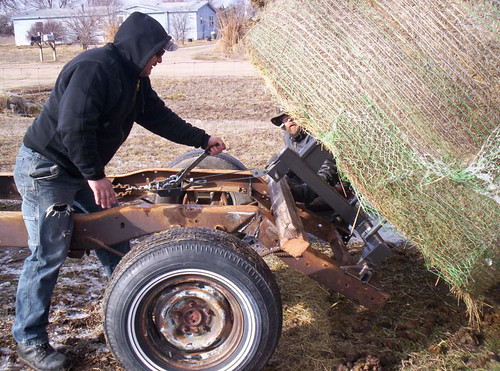
Now for the photo part of our show, because the above is all Greek to me (more like very bad English). This is why Husband doesn't run this blog, but he said you should understand. If not, he is here for you.
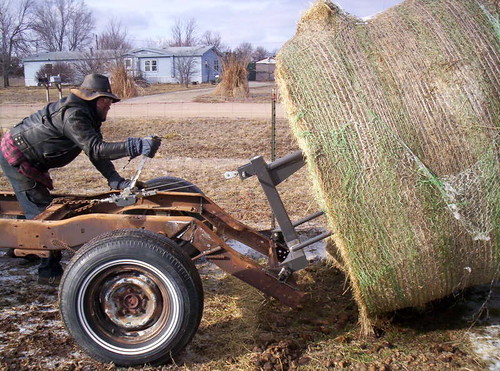
Get your Good Neighbor's truck to try it out on first (This should hook up to our tractor as well)
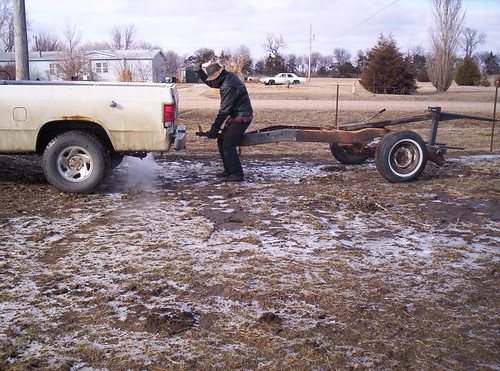
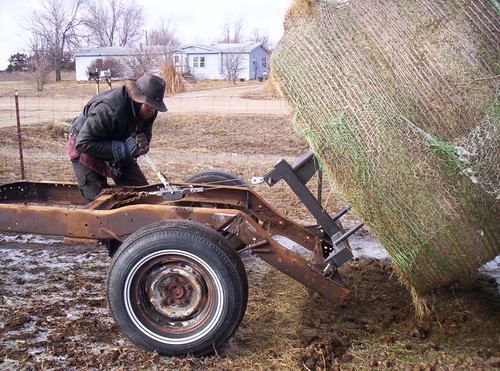
Line it up and . . .
Shove it in
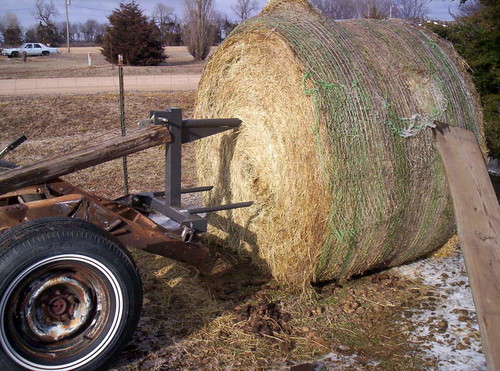
Start ratcheting it up
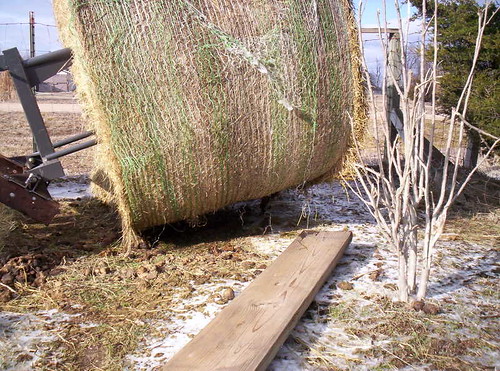
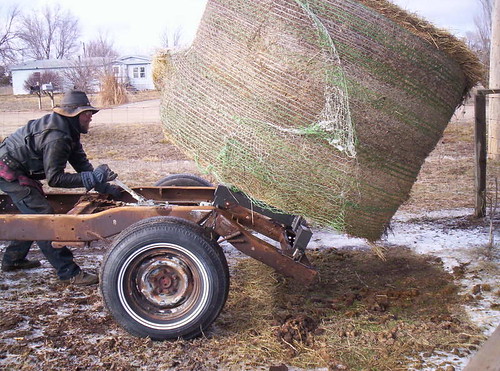
oops, it's sitting on the tires. But it took less then 30 seconds to get it there.
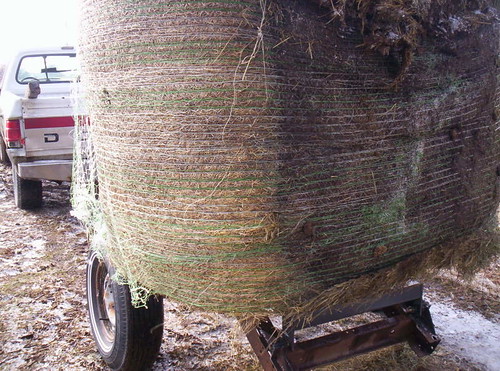
Place the "kick stand" under the spike. Re-bar should fix this.
Now put your Good Neighbor to work, that is after all why he lives next to you.
This is the core of the project. It is not finished, but it is at it's primitive yet functioning level. To get to this point you will need
a detached truck bed trailer
Hay spike
Pipe
couple pieces of angle iron
Harley Davidson front axle 3/4 inch (any solid of that size will work)
piece of chain
3/8 inch bolts to hold chain together
BFH (Big Frickin' Hammer)
Saws all
welder
come-along
A torch if you got em' other wise heat up the corners and whack it with the BFH
First remove the bed from the frame of the truck bed. Make sure that it is below freezing outside and it is only you and your wife. Yell at her when she complains that the bed just fell on her hand, tell her to suck it up and ask her if she's a PIONEER WOMAN!?!
Place the hay spike on the frame, calculate the approximate center of your bales (5 foot bale, theoretically 2 1/2 feet from the ground) The lower it is the better leverage you could have. You might have to lower your rails on the frame. Our frame has zero suspension, all the springs have been removed, so it is sitting on it's bump stops. Blink bars have been welded to the sides of the frame then down to the axle in a V shape to stabilize the axle to the frame, welded directly to the bump stops.
Take two 3 inches of 1 inch steel pipe, heavy gauge, we used the HD axle spacer, cut 4 pieces 2 1/2 inches long out of 3 inch angle iron. Weld the pipe using two pieces of angle iron, opposing in an S or lightening shape, welding it square and flush to one end of the top outside of the angle iron. When done it will look like a P with a tail. Stand it up , clamp it down and weld top and bottom. Take the other piece of iron and box in the P to make it look like inverted T with a dot on top, creating a pivot point with two flanges going forwards and back. Clamp to another piece of angle iron for alignment, weld the top side, cool, flip and weld the bottom side. Now you have an assembly that can be mounted to a flat rail of the frame. Do that twice, to create pivots for both sides.
Calculate your height at plum, make sure your frame tongue is level with the scars on your knees, to get that height. (level to your hitch). Slide your spear lower to points or the pivot pins into your newly made pivots. Clamp down your pivots and weld them onto your frame at the predetermined spear height. Use corner gussets that were cut scraps, 3"x4". Put vertical gussets in the center of the angle iron pivots, weld them.
Ladies, go out and take a photo, while it is snowing and he is welding. Call him silly and run away.
Next, measure for a 4x4 "kick stand" up to the bottom side of the top mount to a frame structure to buck it, wrap a chain around the cross member and link the top mount, come-along to the chain. From there, double check measurements for the 4x4. Measure twice cut once, give yourself a little room to cut again. Then cut the wood, put under the mount wedge in the cross member, then pull everything tight with the come-along. Spear should be relatively horizontal, come-along tight, board wedged in place. At that point you are ready for application.
On the weld, turn it up and burn it in.
Now for the photo part of our show, because the above is all Greek to me (more like very bad English). This is why Husband doesn't run this blog, but he said you should understand. If not, he is here for you.
Get your Good Neighbor's truck to try it out on first (This should hook up to our tractor as well)
Line it up and . . .
Shove it in
Start ratcheting it up
oops, it's sitting on the tires. But it took less then 30 seconds to get it there.
Place the "kick stand" under the spike. Re-bar should fix this.
Now put your Good Neighbor to work, that is after all why he lives next to you.
Monday, February 15, 2010
It's going to be like that. . huh
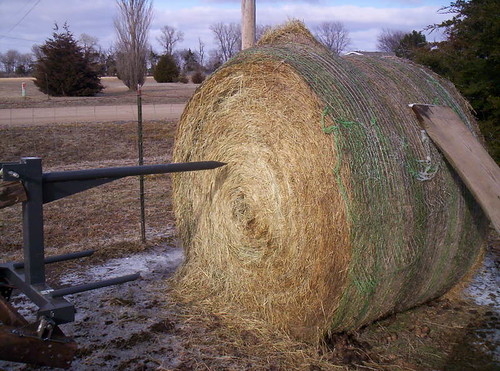
Friday night we went to get another bale. It wouldn't budge. It wanted to slide, have you ever tried to push something that weighs over 1500 lbs, over dry grass and up a truck's tail gate? no? Well I don't recommend it. We stripped the bale in half, then filled the truck, leaving half behind. That seemed to take forever.
That was the last straw (pun?) for husband. Yesterday it was a balmy 32F with wind speeds of 45 mph. I never caught what the wind chill was, but my ears were bright red within a few seconds, and even with gloves on, my fingers were stiff in a few minutes.
We stripped the truck bed of the frame. It's one of those beds that someone turned into a trailer. We got it Free with a bunch of re barb in it. Husband needed my help getting the bed off. That sucker was very heavy, it took several 2x4's grunting, tears that burned and minutes to get it off the frame.
Today husband and horse neighbor are headed into town, were they will be picking up a hay spike, and husband will be finageling and creating a way for us to get the bales without a tractors.
Our tractor would wheelie all the way home (if we could gt it moving) if we tried to get a bale with it. I will be sure to take photos and tell you all about this newest project.
The Homesteaders way is getting a good amount of traffic, thank you guys, We finally added our first homesteading book, from Sally Gardens in Ireland. It is an ebooklet. I have read and enjoyed her blog for years. So I think this is great, and will be getting a copy for myself soon. You can find the listing for it here, under Homesteading Books.
Monday, December 07, 2009
Depression Gift; Play Dough
Children giving gifts to other children can be frustrating, especially when your recipient doesn’t live the same lifestyle as your own child. We have had a rule here for the past 3 years, nothing electronic for Christmas. And I mean nothing. This of course has caused my children to get very creative with their wants, and grandparents calling to tell me they found this gift, and they remember having so much fun with it as a kid. . . well, this makes grandparents very happy. They don’t have to figure out what’s cool and what isn’t, and they get to give things that they have special memories with. I digress, we are talking about giving gifts between our homestead kids and non-homestead kids, something that is super frustrating. Have no fear, Phelan is here!
Play Dough
I know, it is cheap to buy at the stores. But this is something easy to make. My kids love doing it, even my 12 year old, and so far no other child has complained about the gift. Plus this is a great way to rid yourself of stale or freezer burnt flour.
You will need;
2 cups unbleached flour
1 cup salt
1 tablespoon cream of tarter
1 tablespoon of vegetable oil
2 cups of boiling water
various colors, you can use food coloring or make your own (carrots, beets, spinach)
mix the dry ingredients together then add the wet. Mix well. Once it is cooled off enough to handle, parents this will be your job, knead the dough for 3 minutes.

Break off balls as many as you want, and call in the kids. Give them the color and one of the balls, and let them go to town. Make sure they get the color through and through, this takes about 3 minutes. The little ones will tire of it after a bit, just step in before they get too grumpy.

This is completely edible, but because of the amount of salt, one taste will do them.

If the dough is too sticky when kneading, add more flour. Too dry, a bit of water. We keep these in 1/2 pint canning jars. This rarely drys out, if it does, add water and knead.
Firing Dough
This is a very personalized item. Having your children make ornaments or plaques that reminds them of their friend. If they met at a baseball game, or that time when the city friend thought he could catch a calf and ended up with a mouthful of mud. What ever the memory or just something the child likes, firing dough is a great child to child present.
You will need;
3/4 cup boiling water
1/2 cup salt
2 cups unbleached flour
food coloring or paints
Dissolve the salt in the boiling water. Stir to cool, then add all the flour at once. Mix until it forms a ball. Allow to cool to the touch, then knead for 6 minutes. If you are using food coloring, knead only 3 minutes, break into sections, and add the color, kneading each one for 3 minutes.
Cover what you aren’t using with a damp towel, and work your pieces into the shape you want. Add water or flour as needed. If you are hanging your art, make sure you add something to hold it up, paper clips work well.
Heat your oven to 225F for 15 minutes. Lay the dough shape on a foiled covered cookie sheet. Depending on the thickness, bake for 30-90 minutes. Cool and paint. Water colors are great for this. Once they are painted, place back into the oven at 150F for 30 minutes to remove moisture. Because this contains salt, you will need to preserve it so that it doesn’t draw in moisture, do this by covering it with a few coats of clear acrylic paint.

Play Dough
I know, it is cheap to buy at the stores. But this is something easy to make. My kids love doing it, even my 12 year old, and so far no other child has complained about the gift. Plus this is a great way to rid yourself of stale or freezer burnt flour.
You will need;
2 cups unbleached flour
1 cup salt
1 tablespoon cream of tarter
1 tablespoon of vegetable oil
2 cups of boiling water
various colors, you can use food coloring or make your own (carrots, beets, spinach)
mix the dry ingredients together then add the wet. Mix well. Once it is cooled off enough to handle, parents this will be your job, knead the dough for 3 minutes.
Break off balls as many as you want, and call in the kids. Give them the color and one of the balls, and let them go to town. Make sure they get the color through and through, this takes about 3 minutes. The little ones will tire of it after a bit, just step in before they get too grumpy.
This is completely edible, but because of the amount of salt, one taste will do them.
If the dough is too sticky when kneading, add more flour. Too dry, a bit of water. We keep these in 1/2 pint canning jars. This rarely drys out, if it does, add water and knead.
Firing Dough
This is a very personalized item. Having your children make ornaments or plaques that reminds them of their friend. If they met at a baseball game, or that time when the city friend thought he could catch a calf and ended up with a mouthful of mud. What ever the memory or just something the child likes, firing dough is a great child to child present.
You will need;
3/4 cup boiling water
1/2 cup salt
2 cups unbleached flour
food coloring or paints
Dissolve the salt in the boiling water. Stir to cool, then add all the flour at once. Mix until it forms a ball. Allow to cool to the touch, then knead for 6 minutes. If you are using food coloring, knead only 3 minutes, break into sections, and add the color, kneading each one for 3 minutes.
Cover what you aren’t using with a damp towel, and work your pieces into the shape you want. Add water or flour as needed. If you are hanging your art, make sure you add something to hold it up, paper clips work well.
Heat your oven to 225F for 15 minutes. Lay the dough shape on a foiled covered cookie sheet. Depending on the thickness, bake for 30-90 minutes. Cool and paint. Water colors are great for this. Once they are painted, place back into the oven at 150F for 30 minutes to remove moisture. Because this contains salt, you will need to preserve it so that it doesn’t draw in moisture, do this by covering it with a few coats of clear acrylic paint.
Tuesday, November 24, 2009
Depression Gift; Stitches
It is now a well established fact that I can't sew. Nor can I knit or crochet. I can do some pretty cool stuff with metal wire however, and we will get to that later. I can also tat a bit. But I know that some of you out there can and do these this.
Cristine from over at the Treasure Goddess blog left a comment about what she is making for Christmas. I love wrist warmers.
CO 40 stitches, join in the round.
k1, p1 rib for 4 rounds
k3, p1 every round for 5-6 inches from start, then go back and forth (no longer in the round, leaving an opening) still in the K3, P1 pattern (when you go back on the wrong side you're K1, P3 --knit the knits and purl the purls)
knit & purl in pattern back & forth for 12 rows, then go back to knitting tbe pattern in the round for 6 rows.
K1P1 for 4-6 rows and bind off.
(It's actually easier than it sounds).
A few years back, before anyone knew I was here, a friend, JennyO wrote a great article for me on knitting
The first thing she ever made

stockinette:

you can read her article was back in the neophyte vault, here, Guest Blogger; The Neophyte Knitter.
Cristine from over at the Treasure Goddess blog left a comment about what she is making for Christmas. I love wrist warmers.
CO 40 stitches, join in the round.
k1, p1 rib for 4 rounds
k3, p1 every round for 5-6 inches from start, then go back and forth (no longer in the round, leaving an opening) still in the K3, P1 pattern (when you go back on the wrong side you're K1, P3 --knit the knits and purl the purls)
knit & purl in pattern back & forth for 12 rows, then go back to knitting tbe pattern in the round for 6 rows.
K1P1 for 4-6 rows and bind off.
(It's actually easier than it sounds).
A few years back, before anyone knew I was here, a friend, JennyO wrote a great article for me on knitting
The first thing she ever made
stockinette:
you can read her article was back in the neophyte vault, here, Guest Blogger; The Neophyte Knitter.
Friday, January 02, 2009
Winter Project #2
I have some rooms to paint. ~gasp~ But it is winter Phelan! You have to open windows so you don't die from the fumes! And you have migraines, how on earth. . .
Well, we are not going to go out and buy the paint. Nope, winter project #2 is making your own natural paint. I have 3 different recipes that we can use.
#1
1 Quart skim milk (room temperature)
1 Once of hydrated lime by weight ( Do not use quick lime)
1 to 2 1/2 pounds of chalk may also be added as a filler.
Stir together milk and lime to form a smooth paste. Add color pigment of your choice and apply with bristle brush. Allow first coat to dry before applying another.
#2
One Gallon Skim Milk
Two Cups Builders Lime (Do NOT use Quick Lime)
One Quart Linseed Oil (the boiled type)
1/2 Cup of Salt
Dye (Color) add in as needed
Mix all ingredients together and strain through a cheesecloth. Use within a day or two.
#3
Powdered Skim Milk
Water
Food Coloring
Mix just enough powder and water to create the consistency of paint. Add food coloring of your choice or make it various herbs and vegetables. Strain through a cheesecloth.
I will be doing #3, because all I have to purchase is the powdered milk. I think I will be doing a sage green for the living room, it should go well with the mobile home fake wood panels.
Pictures to follow.
Subscribe to:
Posts (Atom)